How to Connect AirPods to iPhone
Over 100 million pairs of AirPods are in active use worldwide, yet many users still struggle with the first step: connecting them to an iPhone. As someone with 15 years of experience analyzing Apple’s ecosystem, I often hear users say, “The setup animation just won’t appear.” If that sounds familiar, this guide is for you.
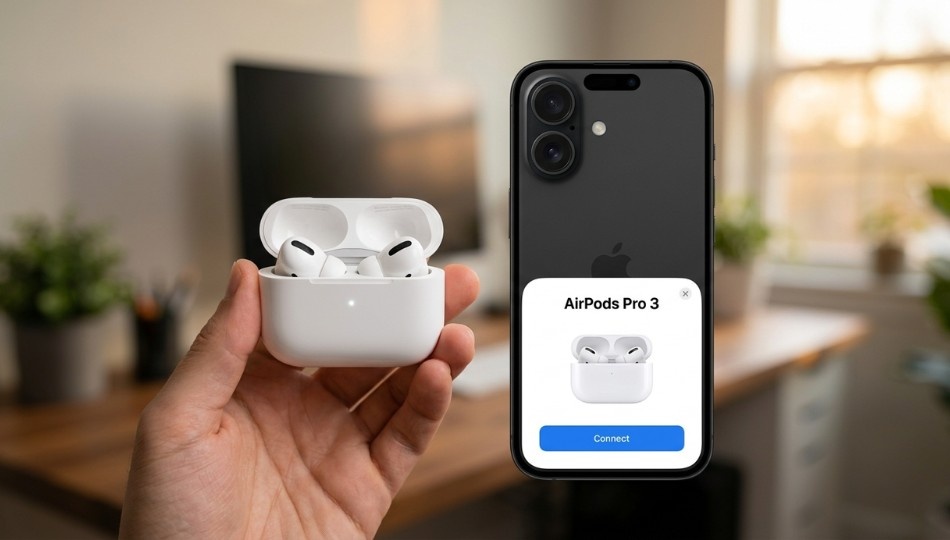
Knowing how to connect AirPods to iPhone is more important now than ever. Apple’s September 2025 launch of the AirPods Pro 3 introduced a new double-tap pairing method, which most older guides haven’t updated. Missing this detail means pressing a button that no longer exists. By the end of this guide, you’ll know how to pair any AirPods model to your iPhone the first time and unlock features most users never notice.
What Connecting AirPods to iPhone Actually Means
Connecting AirPods to an iPhone is the process of linking Apple’s wireless earbuds or headphones via Bluetooth using the W-series chip. Unlike standard Bluetooth devices, AirPods pair almost instantly.
Here’s how it works: opening the AirPods case near an unlocked iPhone triggers a setup animation. Thanks to the H1 or H2 chip, the connection completes in under two seconds. Once paired, AirPods automatically sync across all devices linked to your Apple Account. This makes the initial setup a one-time task for most users.
Why Connecting AirPods to iPhone Is Different in 2026
Apple changed the pairing method, which is why outdated guides often fail.
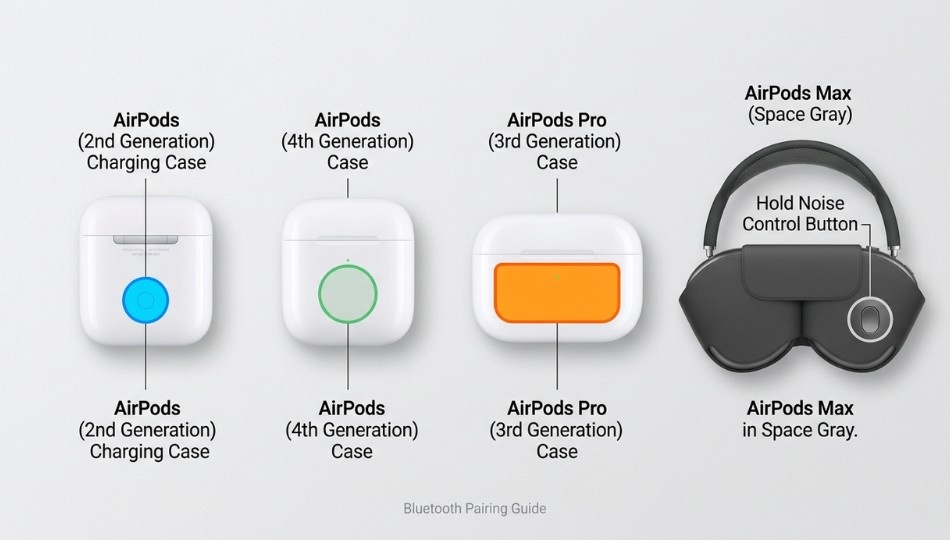
For years, guides told users to press and hold the button on the back of the case until the LED flashed white. That method no longer works for two popular models. The AirPods 4 and AirPods Pro 3 now use a front-facing capacitive sensor. Double-tap the front of the case to enter pairing mode. Press the back, and nothing happens.
Software changes also matter. iOS 26, released with iPhone 17 in September 2025, added new permission requirements for features like heart rate monitoring on the AirPods Pro 3. Without updating your iPhone, you might connect your AirPods but miss key features.
Apple’s documentation confirms that heart rate monitoring and Live Translation require iOS 26 or later. A client of mine spent three weeks troubleshooting her new AirPods Pro 3 because her iPhone wasn’t updated even though she paired them correctly.
The stakes are real. Follow outdated instructions, and what should take 30 seconds becomes a frustrating hour of troubleshooting.
How to Connect AirPods to iPhone: Step-by-Step by Model
Pairing AirPods is quick once you know your model.
AirPods 1, 2, and 3 (Standard AirPods)
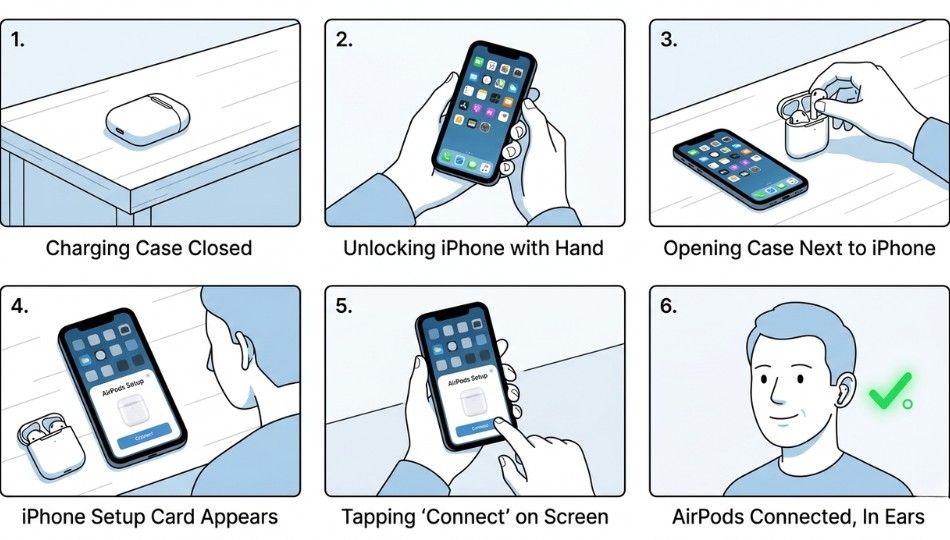
Charge and close the case. Place both AirPods in the charging case and close the lid for 15 seconds to reset the Bluetooth signal.
Unlock your iPhone and hold the case nearby. The iPhone must be unlocked, not just lit. Hold the closed case within two inches.
Open the case lid. Don’t remove the AirPods. The W1 or H1 chip sends a pairing signal. A setup card should appear within three seconds. If not, press and hold the setup button on the back until the LED flashes white.
Tap Connect, then Done. Follow prompts for Siri setup, then tap Done. Your AirPods are paired.
Even skipping the 15-second reset works sometimes, but this small step often avoids unnecessary troubleshooting.
AirPods Pro 1 and 2
The steps are the same. The only difference: after tapping Connect, your iPhone will guide you through an Ear Tip Fit Test. A proper seal is essential for noise cancellation. Skipping this reduces effectiveness.
AirPods Pro 3 (2025 Update)
Steps 1 and 2 remain the same. Step 3 differs: there is no rear button. Double-tap the front of the case until the LED flashes white, then hold it near your unlocked iPhone. After connecting, iOS 26 will prompt you to enable Heart Rate Monitoring and Live Translation. Enable them now to avoid losing features.
AirPods Max
Take the AirPods Max out of the Smart Case and hold them near an unlocked iPhone. The setup animation should appear. If not, press and hold the Noise Control button on the right ear cup for five seconds.
AirPods Max also pair via USB-C. Connect the headphones to your iPhone with a USB-C cable, enable Bluetooth, and pairing completes automatically. This requires iOS 18.4 or later and is useful when Bluetooth interference is a problem.
Automatic vs. Manual Pairing
Most users will only need automatic pairing, but knowing both methods helps when troubleshooting.
| Feature | Automatic Pairing | Manual Bluetooth Pairing |
|---|---|---|
| Speed | Under 3 seconds | 10–30 seconds |
| Requires iCloud sign-in | Yes | No |
| Works across Apple devices | Yes | No |
| Works with non-Apple devices | No | Yes |
| Best for | iPhone + iCloud | Android or shared devices |
| Troubleshooting difficulty | Easy | Moderate |
| iOS version required | iOS 10+ | Any |
Use automatic pairing for AirPods linked to your Apple Account. Use manual pairing when connecting to devices not signed into iCloud, like a work iPhone under an IT profile.
Some situations, like sharing AirPods between Apple IDs, can be tricky. For practical advice from tech experts, see the MacRumors guide to pairing AirPods with iPhone.
A common myth: “You need to open Settings > Bluetooth to pair.” This is only needed if the animation fails or after a reset. For first-time pairing, the animation handles everything.
Some users may need to adjust app permissions or Bluetooth settings. To helpful for trusted apps complements the pairing instructions.
Features You Unlock After Pairing
Connecting AirPods to iPhone isn’t just about sound.
iCloud Sync:
Pair once and AirPods connect to every Apple device linked to your account. No re-pairing required.
Heart Rate Monitoring:
For AirPods Pro 3, track heart rate directly in the Fitness app without an Apple Watch.
Live Translation:
AirPods Pro 3 can translate conversations in real time. Say, “Hey Siri, translate to Spanish” while wearing them. This is especially valuable for travelers.
This setup works best for users deep in the Apple ecosystem. Bluetooth pairing with Android is possible, but all smart features, Siri, and battery status are lost.
If your iPhone still isn’t recognizing your AirPods after following the steps above, there may be an underlying issue with your device. Check iPhone troubleshooting for tips on fixing Bluetooth, battery, and connectivity problems.
Common Mistakes That Break the Connection
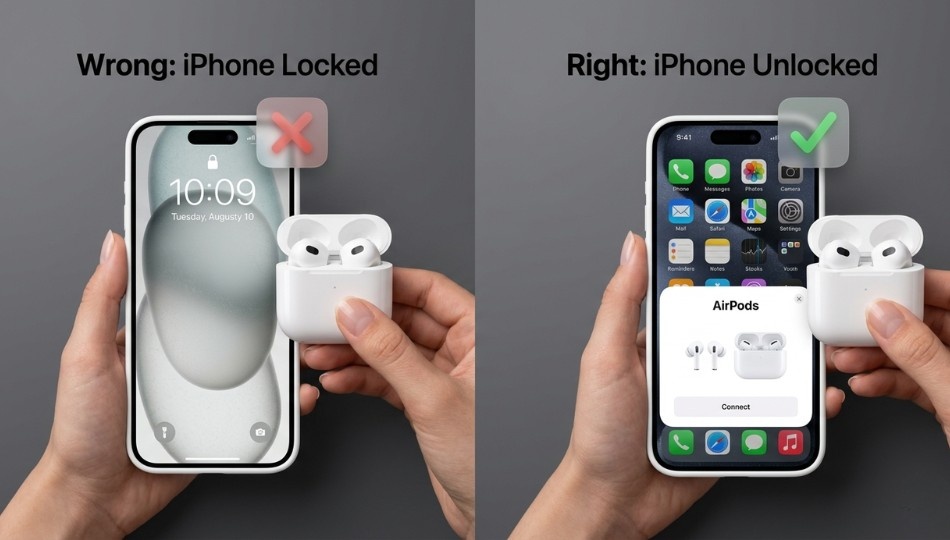
1. Not unlocking the iPhone:
The setup animation only triggers on an active, unlocked screen.
2. Using the wrong instructions for your AirPods model:
AirPods 4 and Pro 3 use double-tap, not the rear button. Check Settings > Bluetooth > (i) next to your AirPods.
3. Skipping iOS updates:
Features like heart rate monitoring require iOS 26. Update first.
4. Previous Apple ID connection:
Used AirPods must be removed from the previous owner’s Apple Account via iCloud.com.
5. Bluetooth interference:
2.4GHz Wi-Fi routers can disrupt pairing. Move away from routers if connections fail.
Three Steps to Take Before Pairing
Check your AirPods model. Pairing methods vary.
Update iPhone to the latest iOS. Necessary for AirPods Pro 3 features.
For used AirPods, remove previous Apple ID. Otherwise, features may fail or pairing may be unstable.
You mention that pairing AirPods can sometimes make users notice battery changes to yellow.
FAQ: Your Real Questions Answered
Open the case near your unlocked iPhone and tap Connect. If the setup card doesn’t appear, press and hold the back button (older models) or double-tap the front (AirPods 4 and Pro 3).
Most likely, your iPhone is locked. Unlock it fully and try again. If needed, close the case for 30 seconds and reopen near the phone.
Full functionality requires the original owner to remove the AirPods from their Apple Account. Otherwise, some features won’t work.
First-time pairing takes 30–60 seconds including Siri setup. After that, AirPods connect in under 2 seconds.
No. The pairing process uses negligible battery. Ongoing connection adds roughly 5% more per hour on iPhone, which is standard for Bluetooth.