How to Fix Black Line on Dell Laptop Screen: The Diagnostic Guide That Actually Works
That thin black line on your Dell screen is easy to ignore at first. Then it starts bothering you every time you open a browser, type a document, or watch a video.
The good news is that this problem is usually easier to diagnose than people think. The bad news is that many guides send you in the wrong direction. They tell you to update drivers first, restart Windows, or download random repair tools before checking whether the screen itself is damaged.
If you want to fix black line on laptop screen Dell devices the smart way, diagnosis has to come first. A black line can come from a damaged LCD panel, a worn display cable near the hinge, bad display settings, or a graphics driver problem. Dell’s own support guidance makes that clear, and it also points out that horizontal or vertical lines can be linked to the display panel, graphics hardware, or cables.
This guide walks you through the fastest way to tell the difference. You will learn how to separate hardware problems from software problems, which fixes are worth trying, and when a repair is the only realistic answer.
FEATURED SNIPPET DEFINITION
A black line on a Dell laptop screen is a display problem that appears as a fixed horizontal or vertical stripe across the screen. In most cases, it is caused by either hardware trouble, such as a failing LCD panel or display cable, or a software issue, such as a graphics driver conflict or incorrect display settings. Dell’s support articles note that lines on the screen can point to the panel, graphics card, or cables, and that the built-in LCD self-test checks the screen hardware only.
Why the Dell Laptop Screen Black Line Issue Demands Attention Right Now
This problem matters because the wrong fix wastes time and money.
If a failing screen panel causes the black line, no amount of driver reinstalling will solve it. On the other hand, if the line comes from a driver conflict or bad display settings, paying for a full-screen replacement is a costly mistake. Dell says incorrect display settings can cause laptop display issues, outdated graphics drivers, software conflicts, or hardware malfunctions. That is exactly why you should test first and repair second.
It is also a problem that tends to get worse, not better. A single line can stay stable for a while, but hardware faults often spread into more lines, flicker, or larger dead areas. If the line changes when you open or close the lid, that is a strong clue that the display cable is under stress near the hinge. If it stays fixed in the same place at all times, the panel itself becomes more likely.
Another reason to act early is that Dell gives you built-in tools to narrow this down fast. The LCD BIST test runs outside Windows and checks the screen hardware directly. That means you can tell very quickly whether you are dealing with Windows, a driver, or the screen itself.
The 5-Stage BIST-to-Fix Framework: How to Fix Black Line on Laptop Screen Dell
Work through these stages in order. Do not skip ahead. Each step gives you evidence, and that evidence tells you what to do next.
Stage 1: The Screenshot Test
This is the easiest test, and it is surprisingly useful.
Press PrtSc on your keyboard, then paste the screenshot into Paint, Word, or any image editor. Look closely at the saved image.
- If the black line appears in the screenshot, the issue is likely tied to software, the GPU, or how the image is being rendered.
- If the screenshot looks clean but the line is still visible on the laptop screen, the problem is almost always physical, meaning the LCD panel or display cable.
Why this works is simple. A screenshot captures what the system is generating, not the physical damage on the panel. So a cracked layer, failing row of pixels, or bad cable usually will not show up in the image file.
This one test can save you a lot of time. It tells you whether you should keep working in Windows or start suspecting hardware.
Stage 2: Run Dell’s LCD Built-In Self-Test (BIST)
Now run Dell’s own hardware screen test.
- Shut the laptop down fully.
- Press and hold the D key.
- While holding D, press the power button.
- Keep holding D until solid colors appear on the screen.
Dell says the screen should cycle through full-screen colors such as black, white, red, green, and blue. During this test, you are checking the panel hardware directly, not Windows, not your apps, and not your graphics driver. Dell also states clearly that the BIST does not test Windows settings, graphics drivers, or software.
What the result means:
- If the line appears during BIST, you are looking at a hardware problem.
- If the line disappears during BIST but comes back in Windows, the panel is likely fine and the issue points to graphics, drivers, or display settings.
This is the most important step in the whole process. Once you know the BIST result, your next move becomes much clearer.
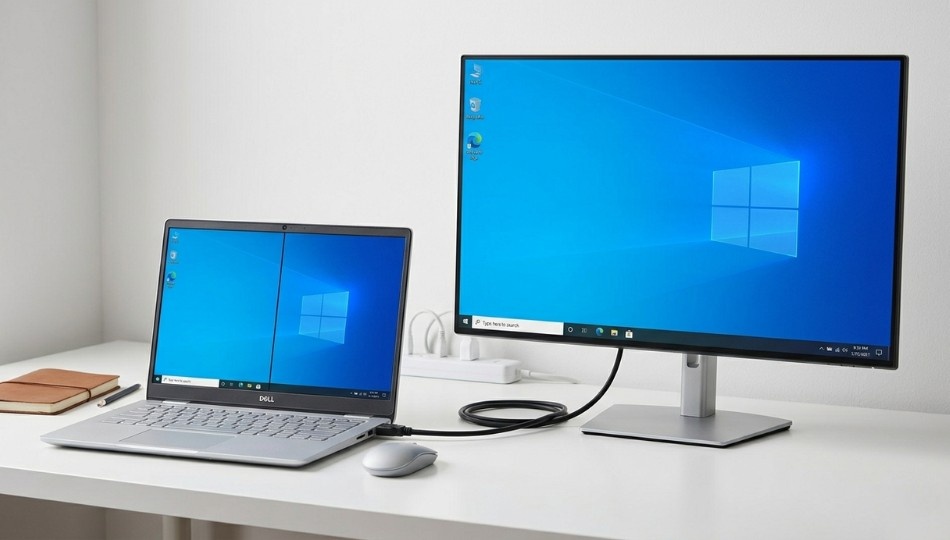
Stage 3: Connect an External Monitor
Next, connect your Dell laptop to a known good external monitor or TV using HDMI, USB-C, or DisplayPort. Then press Windows + P and choose Duplicate, Extend, or Second screen only.
Dell recommends using a known good external display to help identify whether the problem is with the monitor, GPU, or settings. That same approach works well here.
Use the results like this:
- If the external monitor looks normal, your graphics hardware is fine. The problem is more likely the laptop panel or the internal display cable.
- If the same line appears on the external screen too, then the issue may be the graphics driver, GPU, or another system level problem.
This test is especially useful when BIST points to hardware, but you still want to know whether it is the panel path or something bigger.
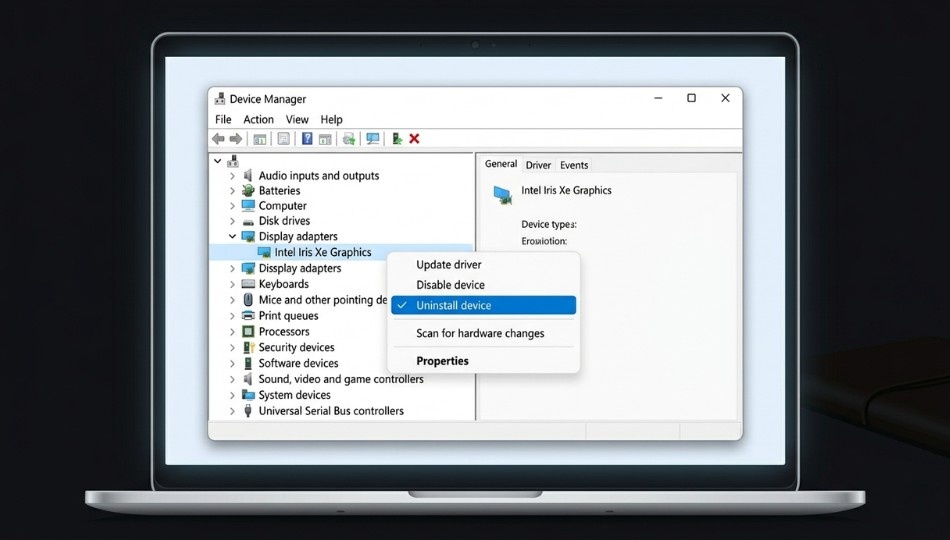
Stage 4: Perform a Clean GPU Driver Reinstall
If your screenshot showed the line and BIST did not, move to drivers.
Open Device Manager, expand Display adapters, right click your graphics device, and uninstall it. Restart the laptop. Then go to Dell’s official Drivers & Downloads page and search using your Service Tag or exact model. Dell recommends downloading drivers from its official support site and warns against using unknown third-party driver sources.
This matters more than many people realize. Generic drivers from Windows Update can work, but they are not always the best match for your exact Dell model and screen configuration. A clean reinstall from Dell’s site is usually the safer path when you are trying to a fix black line on the laptop screen of Dell systems after a driver issue, Windows update, or graphics glitch.
If the problem started right after a Windows update, also check whether Roll Back Driver is available in Device Manager. Sometimes, going back one version is the fastest fix.
Stage 5: Verify Refresh Rate and Native Resolution
Finally, check your display settings.
Go to:
Settings > System > Display > Advanced display
Confirm two things:
- The resolution is set to the panel’s native resolution
- The refresh rate matches what the panel supports
Dell notes that incorrect display settings, including resolution and refresh rate, can cause screen problems such as flicker, distortion, or unstable output. If those values are off, the result can look a lot like hardware trouble.
This is a quick fix, but it is worth checking. It takes less than a minute and sometimes solves the issue without any deeper repair.
Hardware vs. Software: Diagnosing Your Dell Laptop Display Line Problem
Here is the simplest way to read the signs:
The line appears in BIOS or during BIST
This points to hardware. Think LCD panel or display cable.
The line is visible in a screenshot
This points to software, driver, or GPU rendering.
The external monitor is clean
Your laptop’s internal display path is the likely problem.
The external monitor shows the same line
Look harder at the graphics driver or GPU.
The line flickers when the lid moves
That strongly suggests cable wear near the hinge.
The line appears only in one app
This is usually a software rendering bug, not a failing screen.
Dell’s own support flow follows the same general logic: isolate the display, test the panel, check drivers, and confirm settings before making repair decisions.
If your issue looks less like a fixed line and more like a dark patch, blur, or ghosting effect, see our basic troubleshooting for PC.
Two Myths That Need to Die
Myth 1: Pixel fixer software can repair black lines
It cannot.
Those tools are meant for stuck pixels, not failed pixel rows, damaged LCD layers, or bad flex cables. If your issue is hardware, these apps will do nothing except waste your time.
Myth 2: Pressing the screen might make the line go away
Do not do this.
On modern thin laptop panels, pressure can turn a small line into a bigger damaged area. What looks like a harmless tap can spread the fault across more of the display.
A better first hardware step is cable inspection, especially if the line reacts when the lid moves.
Real Results: When the Fix Works and When It Won’t
This process works best when the panel is not physically cracked and the laptop still boots normally.
For example, if the line does not show during BIST, does appear in screenshots, and vanishes after a clean driver reinstall, you are done. No parts needed.
If the line appears in BIST but changes or flickers when you move the lid, a worn display cable is a realistic suspect. In many repair shops, reseating or replacing that cable costs far less than a full screen replacement.
If the line stays fixed in the same place during BIST, with no change when the lid moves, the LCD panel itself is often the real problem. At that point, replacement becomes the most likely fix.
Typical repair costs from your source draft were roughly these: driver fix is free, cable reseating is often inexpensive, and screen replacement is usually the most expensive option, especially on premium XPS models. For a user choosing between cable work and a full panel replacement, that diagnosis step can save real money.
Five Mistakes That Turn a Minor Screen Problem Into an Expensive One
1. Starting with fixes before diagnosis
If you do not know whether the problem is hardware or software, every repair choice becomes a guess.
2. Using random driver sites
Dell explicitly recommends using its official support site for drivers. Third party driver packages can create new problems.
3. Pressing or twisting the display
That can make a small panel fault worse very quickly.
4. Ignoring the first line
Hardware display faults often spread over time. Early action usually gives you cheaper repair options.
5. Replacing the panel before checking the cable
On laptops that are opened and closed daily, the hinge area is a common stress point. A cable problem can look a lot like panel failure.
Three Things to Do Right Now
First, run the screenshot test. It takes less than a minute and instantly tells you whether you should think software or hardware.
Second, run Dell’s BIST. That is the fastest way to confirm whether the panel path is involved.
Third, if BIST points to hardware, get the cable checked before you approve a screen replacement. That one step can be the difference between a small repair bill and a much bigger one.
If you want the most practical answer to fix black line on laptop screen Dell devices, it is this: do not guess. Test, isolate, and then repair the exact part that failed.
Frequently Asked Questions
Usually because of one of two things: hardware or software. On the hardware side, it may be a damaged LCD panel or display cable. On the software side, it may be a graphics driver conflict or bad display setting. Dell’s BIST and a basic screenshot test help you separate the two quickly.
If the issue looks more like a shadow, ghosting, or a dark trail instead of a straight black line, check out computer screen shadow problem.
Yes, sometimes. If the line is caused by a driver or display setting, you may not need any parts at all. If the problem is a loose or worn cable, a technician may be able to reseat or replace that cable without changing the whole panel.
Not always. It often means hardware, but hardware can include the cable as well as the panel. That is why it is worth checking lid movement and running BIST before paying for a new screen.
It tells you whether the screen hardware itself can still display a clean image. Dell says the BIST checks the screen hardware only, not Windows, software, or the graphics driver.
If your laptop is still under warranty, contact Dell first. If it is out of warranty, a local shop can often inspect the cable and confirm whether you need a full panel replacement.